Have you ever seen those mind-blowing designs where words look the same upside down or backward? That’s the magic of making an ambigram! Ambigrams are like optical illusions for words, and they’re taking the design world by storm. Whether you’re a graphic designer, a typography enthusiast, or just someone who loves creative challenges, learning how to make an ambigram can be an incredibly rewarding experience. So, buckle up, because we’re diving deep into this fascinating world of reversible art!
Now, you might be wondering, "What exactly is an ambigram?" Don’t worry; we’ve got you covered. An ambigram is a word or design that retains its meaning when viewed from different perspectives, like upside down, mirrored, or rotated. It’s a blend of art and science, and trust me, it’s way cooler than it sounds. Think of it as a puzzle that your brain loves to solve.
Why should you care about making an ambigram? Well, apart from being super fun, ambigrams can enhance your creative skills, impress your friends, and even land you some cool design gigs. So, whether you’re here to learn for fun or to level up your design game, this article will walk you through everything you need to know about creating stunning ambigrams.
Understanding the Basics of Ambigram Design
What Makes an Ambigram Special?
Let’s break it down. An ambigram isn’t just any old design; it’s a masterpiece that works both ways. Imagine writing the word "love" in a way that still reads "love" when flipped upside down. That’s the power of an ambigram. It’s all about symmetry, balance, and a touch of creativity.
Here’s the cool part: ambigrams come in different types. You’ve got rotational ambigrams, mirror ambigrams, and even 3D ones. Each type has its own set of rules and techniques, but the end result is always jaw-dropping. Whether you’re into minimalist designs or something more intricate, there’s an ambigram style for everyone.
Why Should You Learn to Make an Ambigram?
Learning how to make an ambigram isn’t just about creating cool designs; it’s about expanding your creative horizons. It teaches you to think outside the box, experiment with new ideas, and push the boundaries of traditional typography. Plus, who doesn’t love showing off a skill that not everyone has?
Professionally, mastering ambigram design can give you a competitive edge in the design industry. Clients love unique and innovative designs, and ambigrams are the perfect way to stand out. So, whether you’re designing logos, posters, or even tattoos, knowing how to create an ambigram can open up a world of opportunities.
Tools You Need for Making an Ambigram
Pen and Paper: The Classic Combo
Before you dive into fancy software, let’s talk about the basics. A good old pen and paper are your best friends when it comes to making an ambigram. Sketching out your ideas by hand allows you to experiment freely without the constraints of digital tools. Plus, it’s a great way to develop your hand-eye coordination and fine-tune your design skills.
Here’s a pro tip: use a pencil first so you can erase and refine your sketches as needed. Once you’re happy with your design, you can go over it with a pen. Simple, right?
Digital Tools for Ambigram Design
Now, if you’re more of a tech-savvy designer, there are plenty of digital tools that can help you create stunning ambigrams. Programs like Adobe Illustrator and Procreate offer a wide range of features that make the design process smoother and more efficient.
For beginners, tools like FontStruct and Ambigram Maker can be a great starting point. They provide templates and guidelines to help you create your first ambigram without getting overwhelmed. As you grow more confident, you can switch to more advanced software and really let your creativity shine.
Step-by-Step Guide to Making an Ambigram
Choosing the Right Word
The first step in making an ambigram is choosing the word or phrase you want to design. Keep in mind that shorter words are easier to work with, especially when you’re just starting out. Words with symmetrical letters, like "MOM" or "DAD," are great for beginners because they naturally lend themselves to ambigram design.
Here’s a fun exercise: think of a word that has personal significance to you. It could be your name, a favorite quote, or even a word that represents your passion. This will make the design process more meaningful and enjoyable.
Sketching Your Design
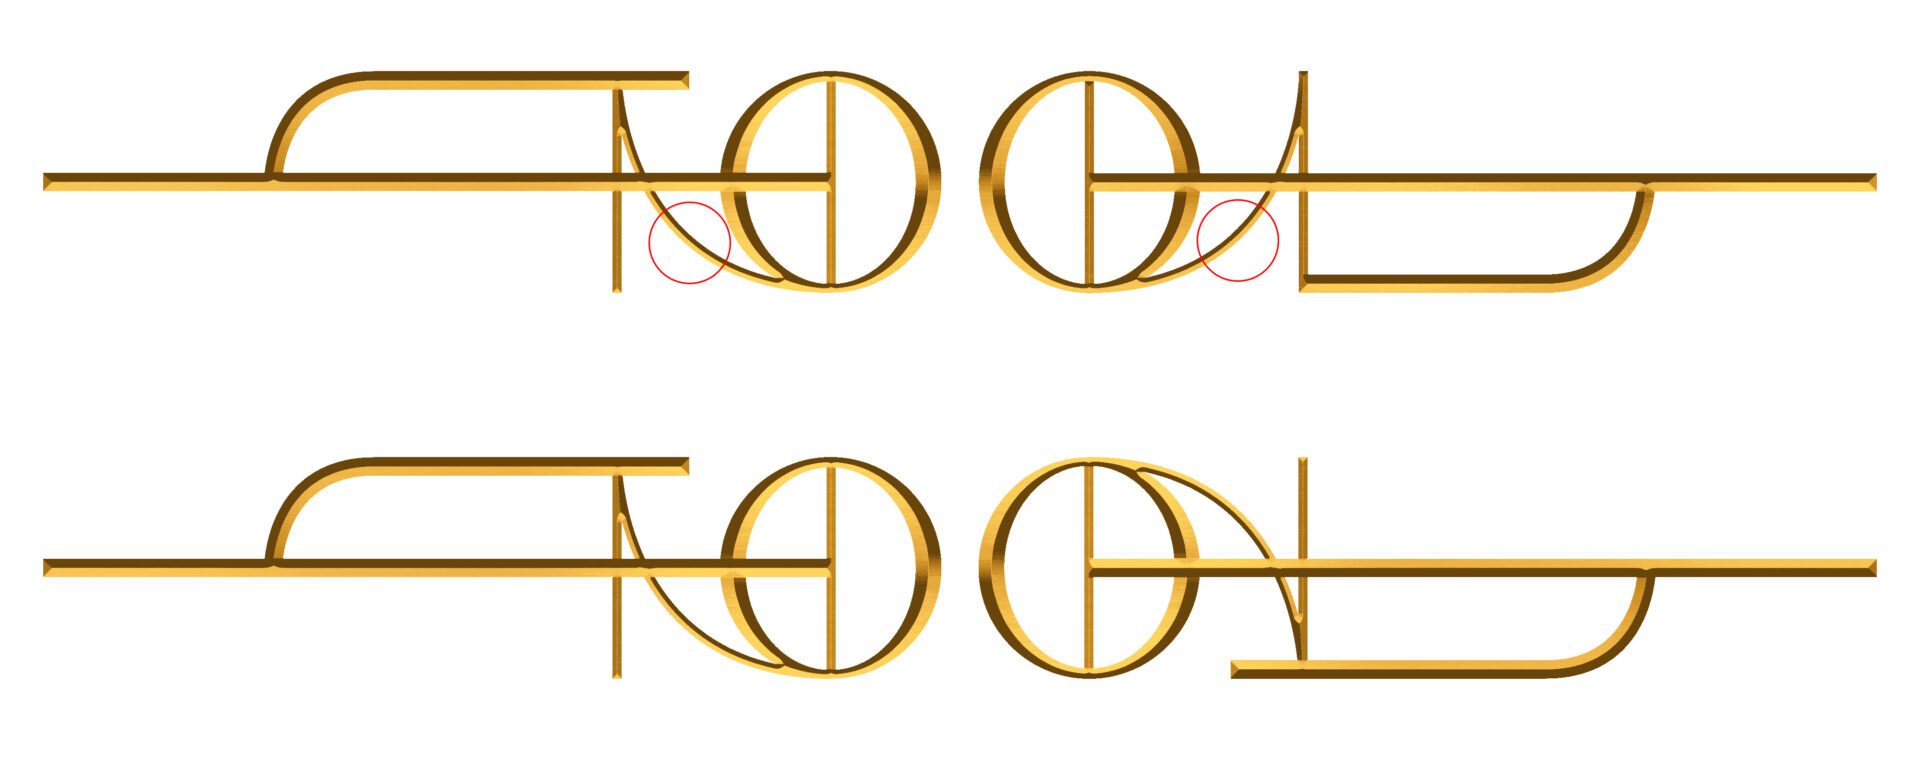
Once you’ve chosen your word, it’s time to start sketching. Begin by writing the word normally, then flip it upside down or mirror it to see how the letters align. Look for opportunities to combine letters or create shapes that work both ways. Don’t be afraid to experiment and try different approaches until you find something that works.
Remember, ambigram design is all about trial and error. You might not get it right the first time, and that’s okay. The key is to keep refining your design until it looks perfect from every angle.
Refining Your Ambigram
Once you’ve got a basic design, it’s time to refine it. Look at each letter carefully and make sure it works both ways. Pay attention to the spacing, symmetry, and overall flow of the design. If something feels off, tweak it until it looks just right.
Here’s where digital tools can come in handy. If you’ve sketched your design by hand, scan it into your computer and use a program like Adobe Illustrator to clean it up and add finishing touches. This will give your ambigram a polished, professional look.
Types of Ambigrams and Their Unique Challenges
Rotational Ambigrams
Rotational ambigrams are the most common type of ambigram. These designs look the same when rotated 180 degrees. Creating a rotational ambigram requires a keen eye for symmetry and a good understanding of how letters interact with each other. The challenge lies in finding ways to combine letters that work both ways without losing their legibility.
For example, the letters "S" and "Z" are natural partners in a rotational ambigram because they look similar when flipped. On the other hand, letters like "B" and "P" require more creativity to make them work together.
Mirror Ambigrams
Mirror ambigrams are another popular type of ambigram. These designs look the same when reflected in a mirror. Creating a mirror ambigram involves flipping the design horizontally, which can be tricky because it changes the orientation of the letters.
One of the biggest challenges with mirror ambigrams is maintaining legibility. Some letters, like "A" and "T," are easier to work with because they naturally lend themselves to symmetry. Others, like "F" and "G," require more creative solutions.
Advanced Techniques for Ambigram Design
Combining Multiple Words
Once you’ve mastered the basics, you can start experimenting with more complex designs. One of the most exciting challenges is creating an ambigram that combines multiple words. This requires careful planning and a lot of creativity to ensure that each word works both ways.
For example, you could create an ambigram that reads "LOVE" one way and "LIFE" the other. The key is to find letters that can serve double duty, like using the letter "E" to form part of both words.
Incorporating Symbols and Shapes
Another way to take your ambigram design to the next level is by incorporating symbols and shapes. This can add an extra layer of meaning to your design and make it more visually interesting. For example, you could incorporate a heart shape into an ambigram for the word "LOVE" or use a star to enhance an ambigram for the word "STAR."
The possibilities are endless, so don’t be afraid to get creative and try new things. The more you experiment, the more skilled you’ll become at making an ambigram that truly stands out.
Common Mistakes to Avoid When Making an Ambigram
Overcomplicating Your Design
One of the biggest mistakes beginners make is overcomplicating their designs. Remember, simplicity is key when it comes to ambigram design. Too many details can make your design look cluttered and confusing, especially when viewed from different angles.
Stick to clean lines and clear shapes, and focus on making each letter work both ways. If something feels too complicated, simplify it until it works seamlessly.
Ignoring Legibility
Another common mistake is ignoring legibility. While it’s tempting to get creative with your design, it’s important to make sure your ambigram is still readable. If the letters are too distorted or abstract, people might not be able to recognize the word.
Always test your design from different angles to ensure it’s legible no matter how it’s viewed. If something isn’t working, go back and refine it until it looks perfect.
Real-Life Applications of Ambigram Design
Logo Design
Ambigrams are a fantastic choice for logo design because they add a unique and memorable element to a brand. Companies like Nike and Apple have used ambigram-like designs to create logos that stand out and resonate with their audience.
Think about how an ambigram could enhance your brand’s identity. Whether you’re designing a logo for a tech company or a fashion brand, an ambigram can add a touch of creativity and sophistication that sets you apart from the competition.
Art and Illustration
Beyond logos, ambigrams are also popular in the world of art and illustration. Artists use ambigrams to create stunning visual pieces that challenge viewers’ perceptions and invite them to look closer. From murals to digital art, ambigrams have a place in almost every artistic medium.
If you’re an artist looking to expand your portfolio, learning how to make an ambigram can be a great way to showcase your skills and attract new clients.
How to Promote Your Ambigram Designs
Sharing Your Work on Social Media
Once you’ve created your ambigram, don’t keep it to yourself! Share your designs on social media platforms like Instagram, Pinterest, and Behance. Use hashtags like #AmbigramArt and #Typography to reach a wider audience and connect with other designers who share your passion.
Engage with your followers by asking for feedback and suggestions. This will help you improve your skills and build a community of like-minded creatives who can inspire and support you.
Collaborating with Other Designers
Collaborating with other designers is another great way to promote your ambigram designs. Whether you’re working on a joint project or just sharing ideas, collaborating can help you grow as a designer and expand your network.
Look for opportunities to team up with designers who specialize in different areas, like 3D modeling or animation. By combining your skills, you can create something truly unique and innovative.
Conclusion: Your Journey into Making an Ambigram Starts Here
Making an ambigram is more than just creating a design; it’s about exploring the boundaries of creativity and pushing yourself to think differently. Whether you’re designing for fun or looking to build a career in design, mastering the art of ambigram creation can take you places you never imagined.
So, what are you waiting for? Grab your pen and paper or fire up your favorite design software and start creating your first ambigram today. Remember, practice makes perfect, so don’t be afraid to experiment and try new things. And when you’re done, don’t forget to share your masterpiece with the world!
Before you go, we’d love to hear from you. What’s your favorite type of ambigram? Have you tried making one before? Leave a comment below and let’s keep the conversation going. And if you enjoyed this article, don’t forget to share it with your friends and follow us for more creative tips and tricks!
Table of Contents
- Understanding the Basics of Ambigram Design
- Tools You Need for Making an Ambigram
- Step-by-Step Guide to Making an Ambigram
- Types of Ambigrams and Their Unique Challenges
- Advanced Techniques for Ambigram Design
- Common Mistakes to Avoid When Making an Ambigram
- Real-Life Applications of Ambigram Design
- How to Promote Your Ambigram Designs
- Conclusion